
Para la instalación de la pantalla LCD1602 con modulo I2C de Yrobot les dejo un rápido mini instructivo debajo:
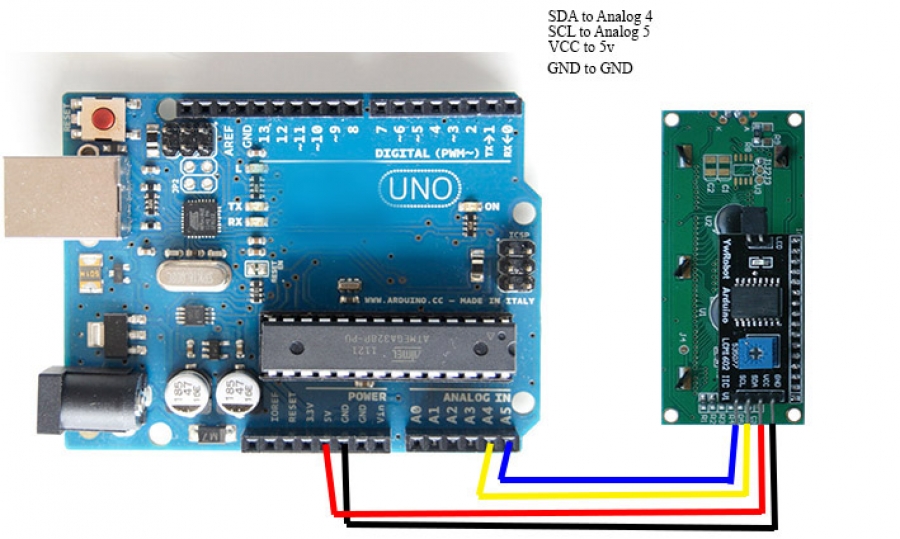
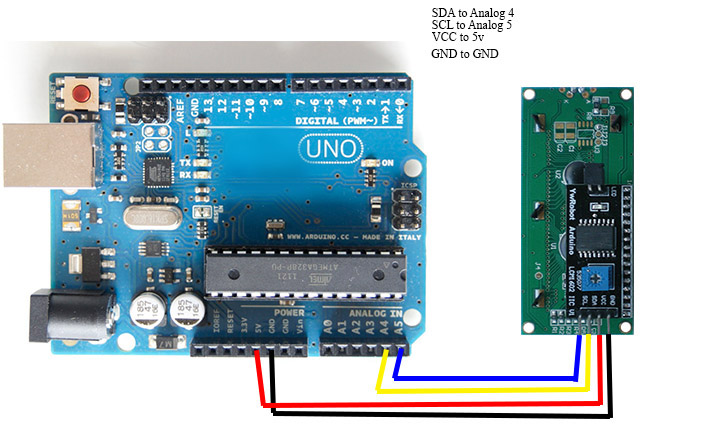
1.- CONEXIÓNES DE ALAMBRES DESDE ARDUINO UNO R3 Y ARDUINO MEGA 2560 A UNA LCD 1602 CON Modulo I2C Yrobot.
| Arduino UNO R3 | LCD1602 I2C |
| 5VDC | VCC |
| GND | GND |
| PIN A4 | SDA |
| PIN A5 | SCL |
| Arduino Mega2560 | LCD1602 |
| 5VDC | VCC |
| GND | GND |
| SDA(PIN 20) | SDA |
| SCL(PIN 21) | SCL |
2.- Subir el código al arduino que detecta la dirección de la LCD.
teniendo la librería wire.h instalada. Al abrir el monitor serie del programa Arduino IDE mostrara la dirección que tiene la pantalla configurada. Programa debajo:
CODIGO:
Written by Nick Gammon
Date: 20th April 2011
#include <Wire.h>
void setup()
{
Serial.begin (115200);
// Leonardo: wait for serial port to connect
while (!Serial)
{
}
Serial.println ();
Serial.println ("I2C scanner. Scanning ...");
byte count = 0;
Wire.begin();
for (byte i = 1; i < 120; i++)
{
Wire.beginTransmission (i);
if (Wire.endTransmission () == 0)
{
Serial.print ("Found address: ");
Serial.print (i, DEC);
Serial.print (" (0x");
Serial.print (i, HEX);
Serial.println (")");
count++;
delay (1); // maybe unneeded?
} // end of good response
} // end of for loop
Serial.println ("Done.");
Serial.print ("Found ");
Serial.print (count, DEC);
Serial.println (" device(s).");
} // end of setup
void loop() {}
3.- Con la dirección que es desplegada en el monitor Serial de Arduino IDE procedemos a programar el código, lo que queremos desplegar en la LCD, y si es necesario cambiamos la dirección.
En nuestro Caso de ejemplo la dirección encontrada fue:
- Found address: 39 (0x27)
hay que tener la librería LiquidCrystal_I2C.h instalada en arduino IDE.
Nota: la librería que trae arduino IDE, regularmente es compatible Con la panalla LCD1602 I2C, pero a veces depende del fabricante y la asignación interna de los pines en la librería.
Si la librería que trae Default arduino IDE no es compatible, las Librerías están en el siguiente link:
Para instalar la libreria bajada, lo mas conveniente es remover la que trae arduino ide default y compiar la nueva en el folder de las librerias, que regularmente es:
- C:\Program Files\Arduino\libraries
Subir siguiente programa a arduino:
CODIGO:
/*
16 character 2 line I2C Display
Backpack Interface labelled "YwRobot Arduino LCM1602 IIC V1"
*/
/*-----( Import needed libraries )-----*/
#include <Wire.h>
#include <LiquidCrystal_I2C.h>
/*-----( Declare Constants )-----*/
/*-----( Declare objects )-----*/
// set the LCD address to 0x27 for a 20 chars 4 line display
// Set the pins on the I2C chip used for LCD connections:
// addr, en,rw,rs,d4,d5,d6,d7,bl,blpol
LiquidCrystal_I2C lcd(0x27, 2, 1, 0, 4, 5, 6, 7, 3, POSITIVE); // Set the LCD I2C address
/*-----( Declare Variables )-----*/
//NONE
String myName; //Declare a String variable to hold your name
int age; //Declare an Int variable to hold your age
float height; //Declare a float variable to hold your height
String inByte[50];
int setPoint = 55;
String readString;
void setup() /*----( SETUP: RUNS ONCE )----*/
{
Serial.begin(9600); // Used to type in characters
lcd.begin(16,2); // initialize the lcd for 16 chars 2 lines, turn on backlight
// ------- Quick 3 blinks of backlight -------------
for(int i = 0; i< 3; i++)
{
lcd.backlight();
delay(250);
lcd.noBacklight();
delay(250);
}
lcd.backlight(); // finish with backlight on
//-------- Write characters on the display ------------------
// NOTE: Cursor Position: (CHAR, LINE) start at 0
lcd.setCursor(0,0); //Start at character 4 on line 0
lcd.print("Hi, VRACOM, S.A.");
delay(1000);
lcd.setCursor(0,1);
lcd.print("Testing Your LCD");
delay(5000);
// Wait and then tell user they can start the Serial Monitor and type in characters to
// Display. (Set Serial Monitor option to "No Line Ending")
lcd.clear();
lcd.setCursor(0,0); //Start at character 0 on line 0
lcd.print("www.vracomsa.com");
lcd.setCursor(0,1);
lcd.print("+(507) 836-6461");
}/*--(end setup )---*/
void loop()
{
}